Monday, December 1, 2014

FINAL BATTLE: HULK VS. SUPER SAIYAN'S

1) First, I started off with this image as my background:
2) Next, I took the signature on the bottom right corner off with the (Clone Stamp Tool).
3) Then, I added images of the characters fighting:

4) I added an orbit to the hand of the 2nd image. I flipped it and erased the outer edges:


 5) I erased the background of the 3rd image to where it was just the Hulk. I added the Hammer of Thor to Hulks hand. I flipped it and erased the portion of the handle where the hulks hand would be. I also erased the grey background of the image:
6) I also added a blood stain to the hammer:

7) I added a smokey cloud effect on the background with a paint brush tool. I changed the opacity and changed the shape of the brush.

8) I added some blood splatter to the Hulks chest:
9) I also added blood splatter to one of the Super Saiyan's:
10) Lastly, I added flames to the background to add a battle effect:
The final product ended up looking like this:

I HOPE YOU ENJOY!!


Monday, October 27, 2014

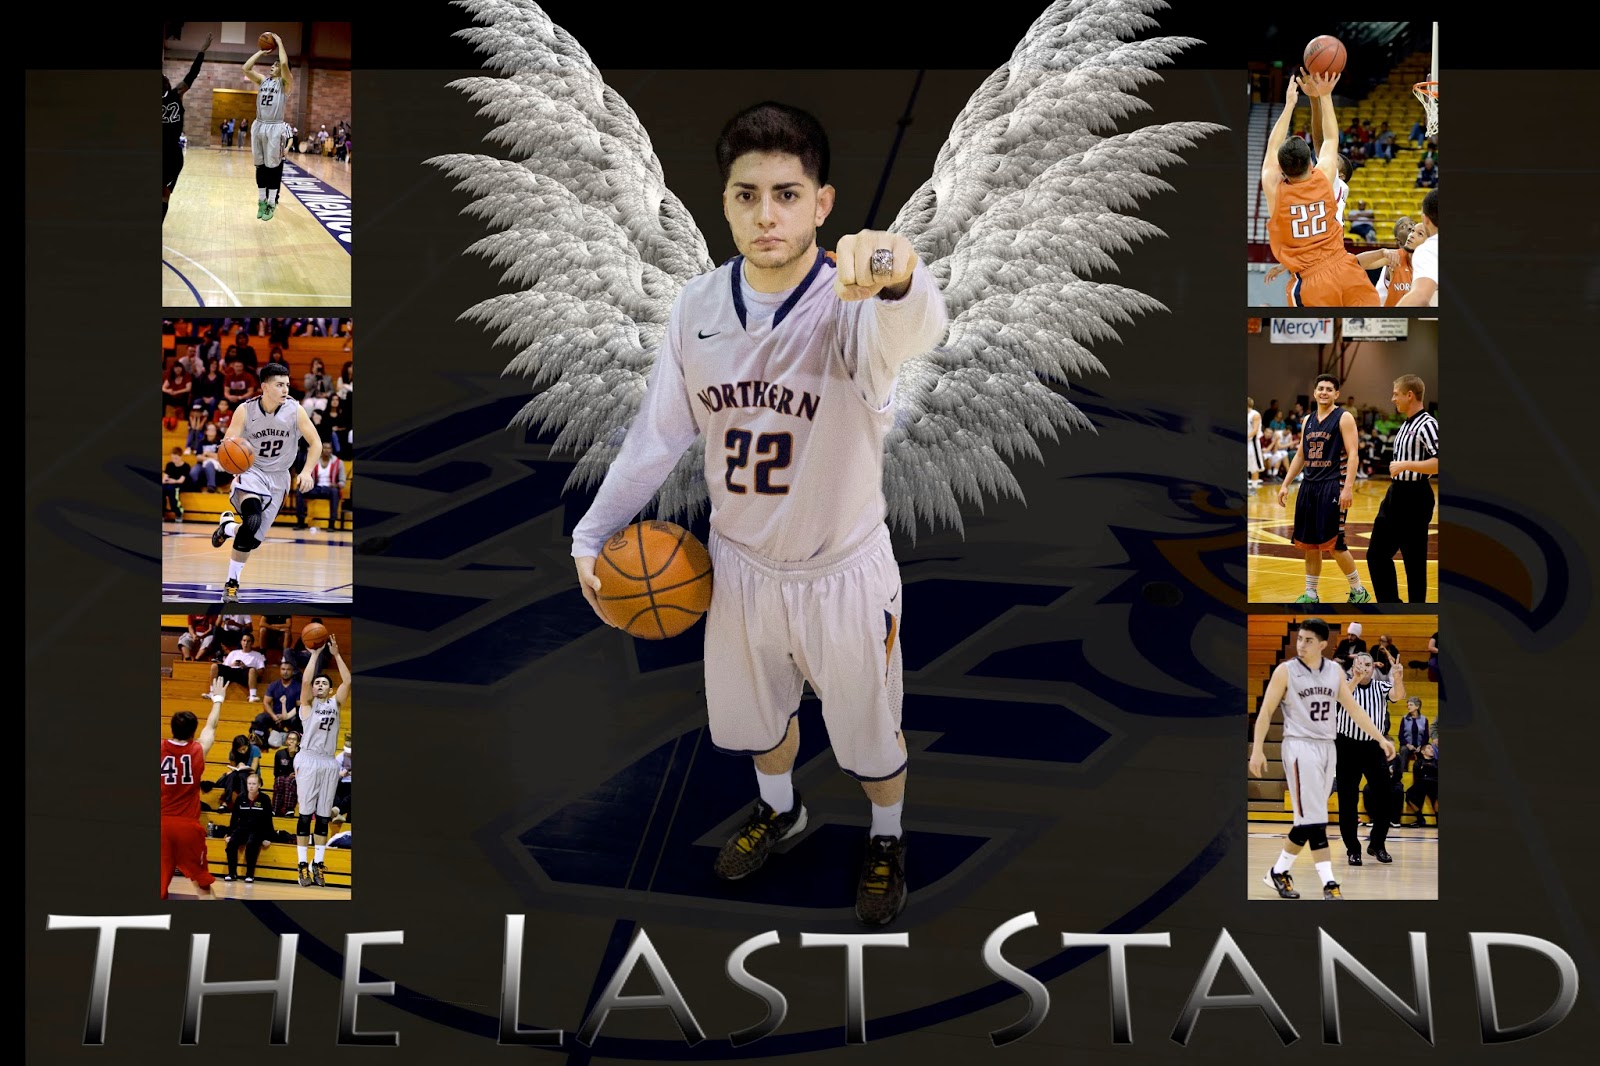
Midterm Project (The Last Stand)

My original images were:


1) I created a Layer and colored it solid black. 
2) I edited some "smart filters" on my main image to change the lighting and shadowing. I also changed the "Lighting Effects". I also used a brush to soften up the edges. 
3) With the wings, I cropped out all of the black so that way the wings were the only thing showing. I also made some 3D changes to warp the wings. 
4) I created a Text layer and typed "The Last Stand". I Edited the texture of it. I selected "Diffuse".

My final product was: 


Monday, September 29, 2014

G.O.A.T.

My original image that I chose was:

1. Image> Adjustments> Desaturate
2. Next, I adjusted the Brightness and Contrast
3. Select> Color Range> Midtone
4. Copy> New Layer> Paste
5. Select> Color Range> Shadows
6. Copy> New Layer> Paste
7. Create Text Layer > Write Text> Create New Layer Mask> Copy Shadow Image> Paste onto mask> Invert
8. Next, I created a new layer and colored it YELLOW/GOLD and dragged it all the way to the bottom.

My final product was:

Monday, September 22, 2014

Sky Face

I started out with the following images:


1. Mask out the black of the woman. I had to use the Quick Selection tool to select her face then I used "Refine Edge" to create the mask of the woman's face. Under "Refine Edge" I clicked output then selected Layer Mask.

2. Next, we desaturated the woman's face.
3. We duplicated the layer and then started working on the top duplicated layer. 
4. Next, we selected the image and added color dodge.
5. Next, we inverted the image by selecting (command, I). 
6. Next, we went to Filter, Blur, Gaussian Blur.
7. Next, we selected both layers, right clicked, and selected Merge Visible. 
8. Duplicate the layer.
9. Create a Smart Blur. Quality: High/ Mode: Edge Only.
10. Merge Visible layers again.
11. Filter>Filter Gallery>Rough Pastels
12. Next, we placed the Sky Layer above the Rain Layer and made Sky Layer Color Blur.
13. Rain Texture (65% Opacity)
14. Make the Sketch Art Opacity at 60%.

Once I blended all of the layers the following image was created:


Monday, September 15, 2014

Triplets

I started off with this image:
This was a more difficult project but I learned a lot throughout the process.
I learned how to use the Clone Stamp Tool (S). This allowed me to copy a portion of the image and blend it onto another portion of the image.
I also learned how to use the Healing Brush Tool (J).
I need to be more careful when I am using my masks. I did a sloppy job with my masks and it led to me not being able to blend the neck and chest well.

The finishing product is:

Monday, August 25, 2014

Vampire Lady

 Originally, the photo of the lady drinking from the wine glass looked like this:

 After learning how to use:
1) Quick Selection Tool (W) This is how I selected the woman's face.
2) Desaturation (I changed the color of the woman's face by selecting Image/ Adjustments/ Desaturate)
3) Hue/Saturation tool was the second step after Desaturation
4) Layer Masking (I had a total of 2 layers and 1 Layer mask on the copy)
5) Zoom (Z)
6) Brush (B)
I was able to make the photo look like this:


Monday, August 18, 2014

First Low- Rider On The Moon

Hello Perry,

     My name is Christian Barraza and I am a senior in the Psychology BAIS program. I am from El Paso, TX. Hence my blog name. I have an interest in digital media productions so this class should be a good experience for me. I am also taking this class because I need a few more electives before I graduate.

My first project involved a picture of a man driving a low- rider and an astronaut standing on the moon:


I was instructed to take the background out from the first photo and then place the car on the moon. The picture came out like this: 


I used the magnetic lasso tool in order to outline the vehicle. Once the vehicle was outlined I clicked "Refine Edge". This allowed me to create a layer mask which enabled me to use the brush tool (B) in order to select what I wanted to erase and what I wanted to keep. 
Some shortcuts that I used were:
"X" In order to change from one color to another.
"Z" In order to zoom.
"H" In order to select the hand.
"B" for brush.
"Alt" in order to change the mask view.
The order of the layers is supposed to depend on which picture you want on top or on bottom. Just like a deck of cards.